The Desktop Experience feature makes your
Window VPS look like local your Windows 7 desktop. The Desktop Experience installs some useful components and features of Windows 7, such as Desktop themes, Disk Cleanup, Windows Media Player, Windows Defender, Snipping Tool etc. Refer following steps if you want to enable these additional desktop features in your VPS:
For Windows Server 2008
- Go to Start >> Administrative Tools >> Server Manager.
- At left side pane, click on Features. Under the Features Summary section, click on Add Features.
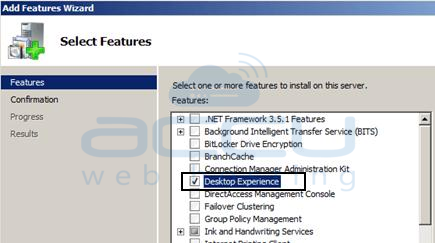
- On the Select Features page, select the Desktop Experience check box.

- Review required features that need to be installed and then click Add Required Features, click Next.
- At Confirm Installation Selections page, make sure that Desktop Experience feature will get installed, click Install.

- At Installation Results page, you will be asked to reboot the server to finish the installation process.
- Just click Close, and then click Yes to reboot the server.
- Once server restarts log in to server and server will finish remaining installation steps.
For Windows Server 2012Â
- Go to Start >> Administrative Tools >> Server Manager.
- At Server Manager, click on Features.
- In the Server Manager details pane, under Features Summary, click Add features.
- This will start the Add Features Wizard.

- Now, in the Features list, select Desktop Experience, and click Install.


