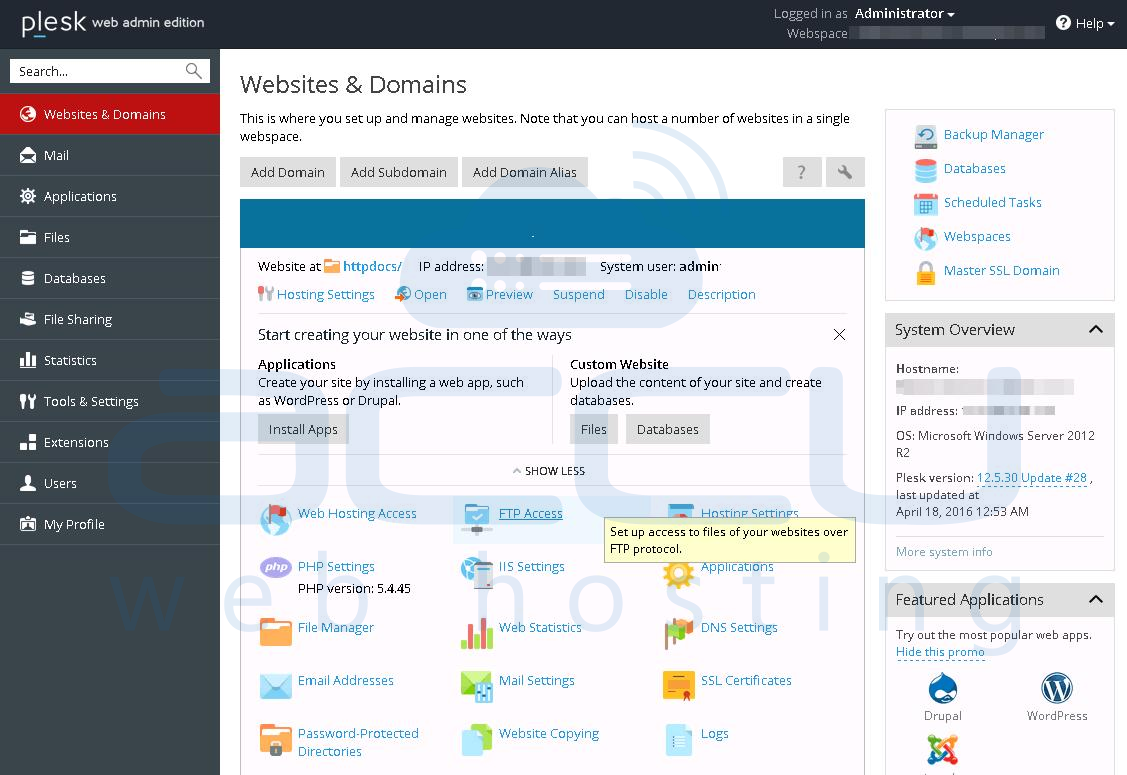
This article will assist you to install the Plesk Control Panel on Windows Server.
Login to your Windows VPS via Remote Desktop and browse the Plesk Panel download page.
Step - 2
Fill up the license form to receive the license keys at your registered email address.

Once you fill-up the license form, Plesk license information will be sent to you on registered email address and following screen will appear.

Click on Plesk Windows Installer icon and installer file will be downloaded in your local computer. Once installer file is downloaded, run the setup file to initiate the setup process.

This will launch the Plesk installation web interface in default browser of your system as shown in following screen.

Step - 6
On the next screen, you will see Plesk login screen appearing on URL http://localhost:8447. Specify your Administrator credentials and click on Log In button.

On the next screen, click on Install or Upgrade Product link.

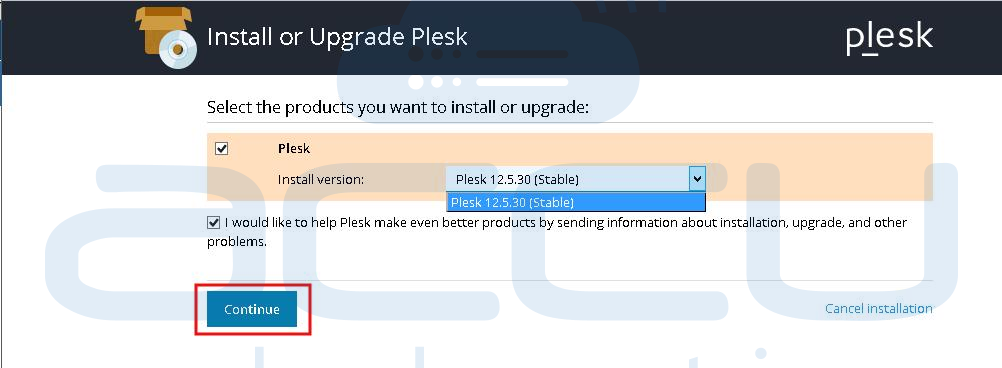
Check the checkbox Plesk and select the Plesk version from drop down menu. Click on Continue button.
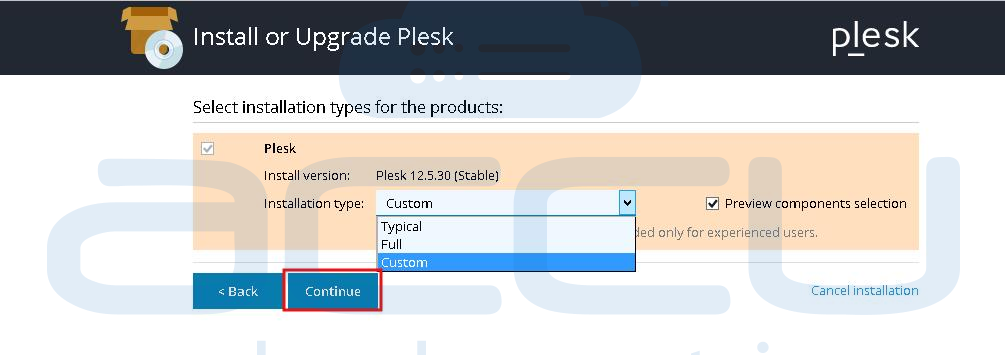
On the next screen, select the Installation Type as Custom and click on Continue button.
Step - 10
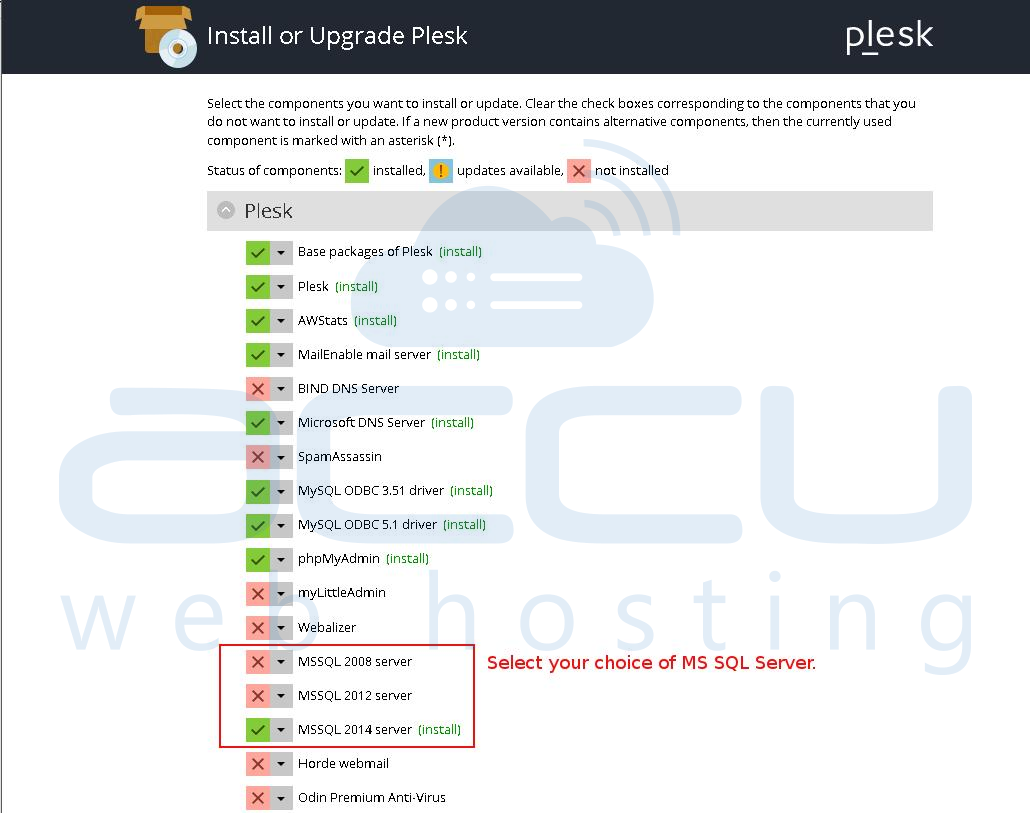
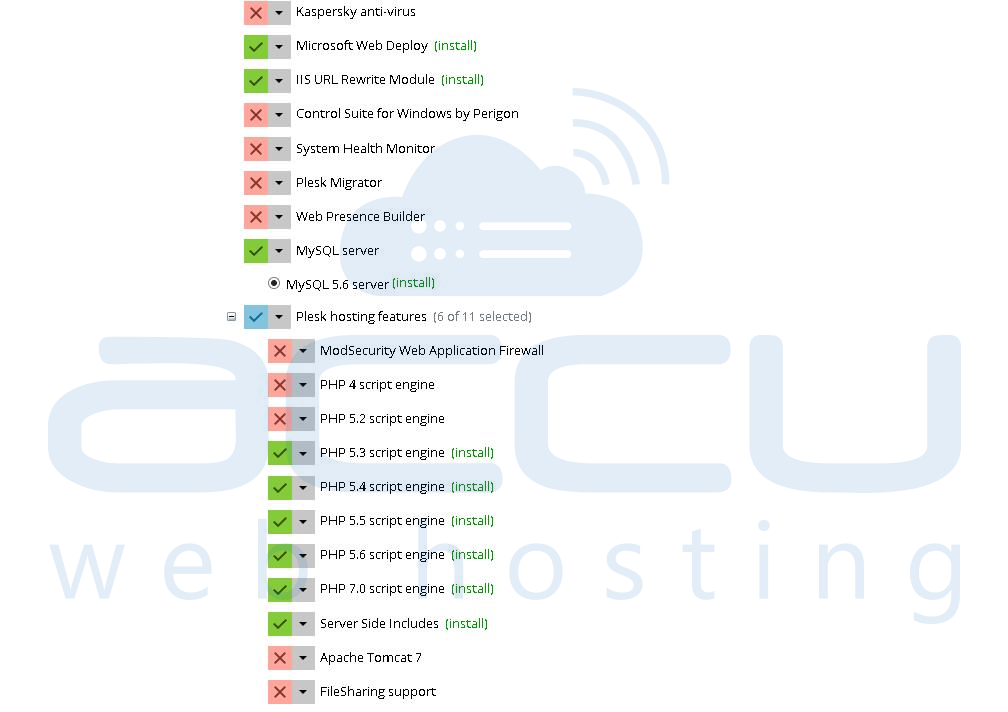
Select the componenets you wish to install in your server and click on Continue button. In the default VPS configuration, we install components selected in following screens. If you wish, you can select/deselect the components according to your requirements. In our setup, we chosen the MS SQL Server 2014, though you can select your choice of MS SQL Server.
Keep the paths of installation directory, user data and website content as they are. Specify the Plesk Administrator password and click on Continue button. This will launch the component installation process.

You can see the Plesk installation progress as shown in following screen. Note that Plesk installation may take approximate 1 to 2 hours based on your Internet connection.

When Plesk is installed, you will see following successful completion screen.

On the next screen, accept the terms of the license agreeement. Check the checkbox Do not show it again, if you don't want this screen appear again while login to Plesk. Â

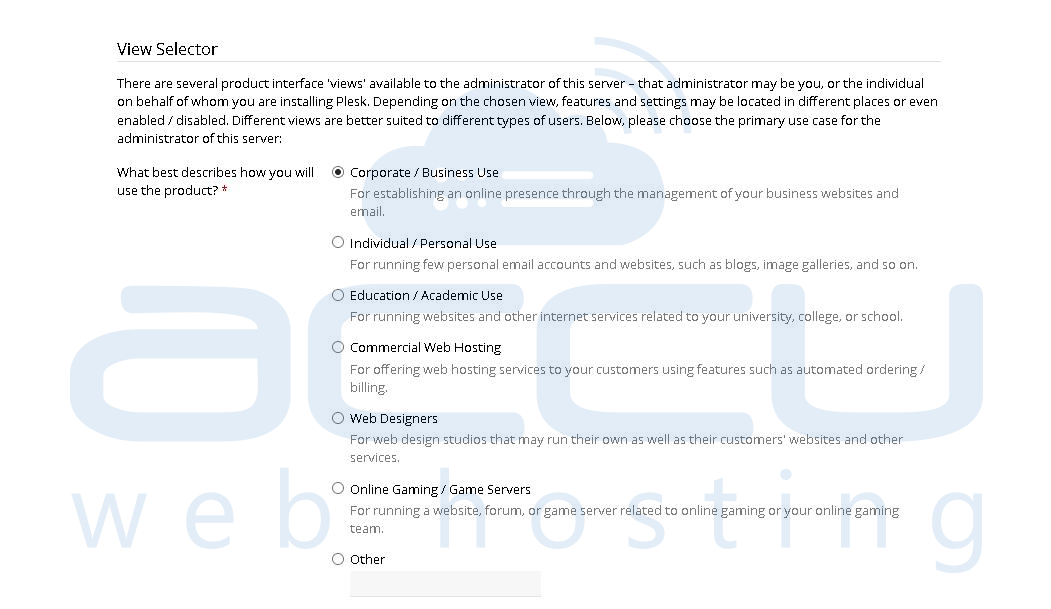
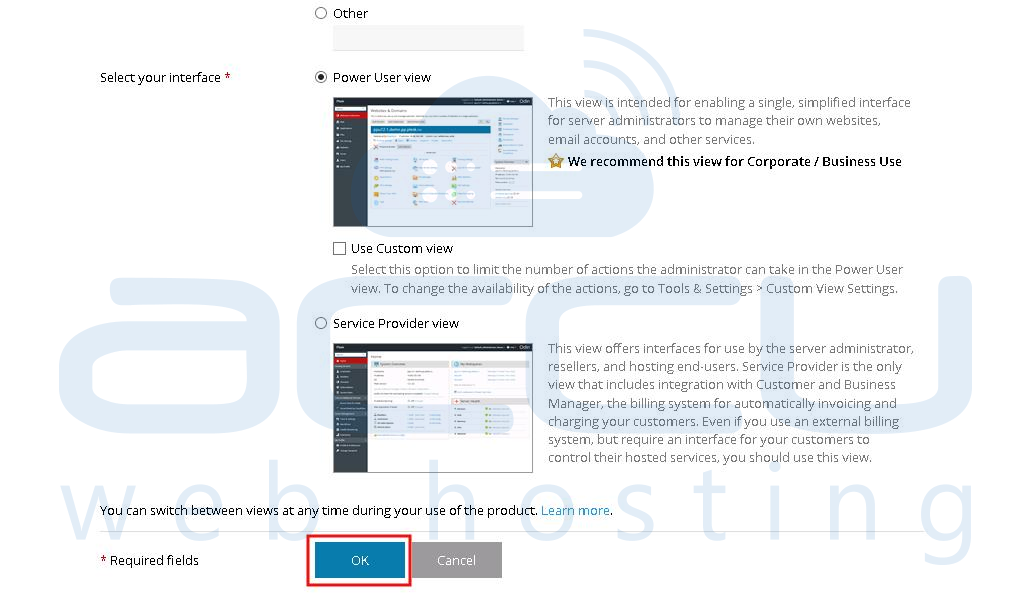
On the View Selector screen, select your choice of View based on how you would use the Plesk Panel.
Specify the hostname of the server and change default administrator password. Click on OK button to proceed.

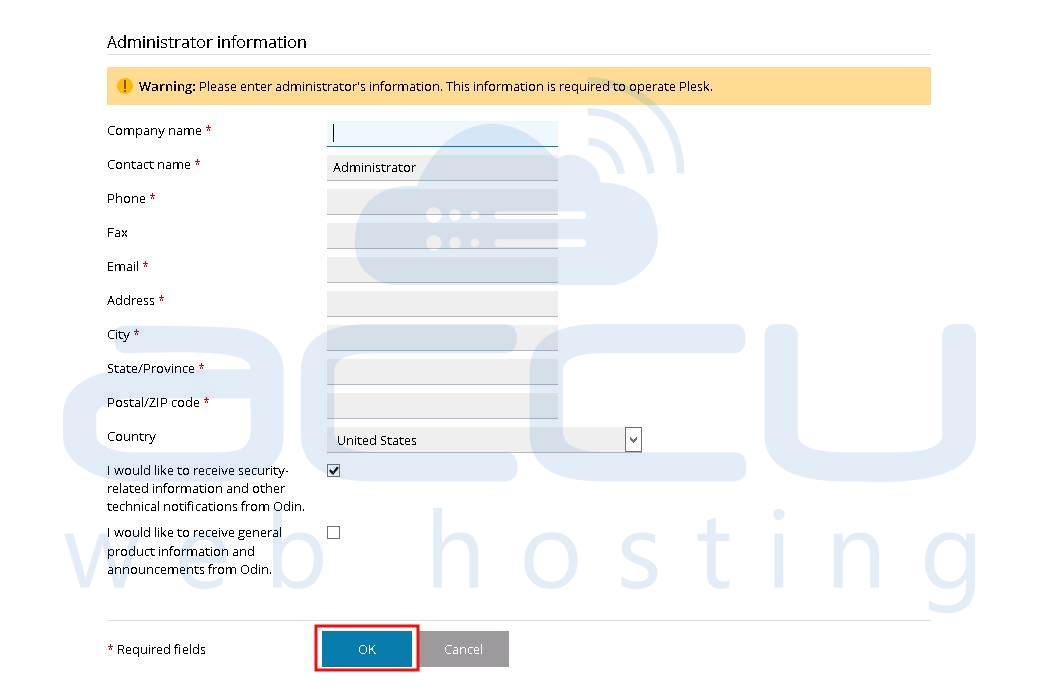
Specify the details of Plesk Administrator and click OK button to proceed.
On the next screen, click on Install Key to activate the Plesk license key.

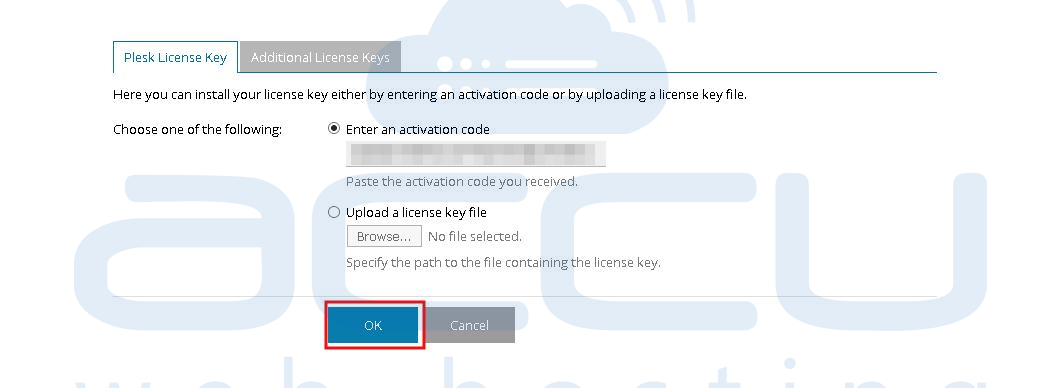
On the next screen, choose your choice of license activation method. Either specify the activation code you received in registered email account, OR you can upload the XML file of license key.
Step - 1
Login to your Windows VPS via Remote Desktop and browse the Plesk Panel download page.
Step - 2
Fill up the license form to receive the license keys at your registered email address.
Step - 3
Once you fill-up the license form, Plesk license information will be sent to you on registered email address and following screen will appear.

Step - Â 4
Click on Plesk Windows Installer icon and installer file will be downloaded in your local computer. Once installer file is downloaded, run the setup file to initiate the setup process.

Step - 5
This will launch the Plesk installation web interface in default browser of your system as shown in following screen.

Step - 6
On the next screen, you will see Plesk login screen appearing on URL http://localhost:8447. Specify your Administrator credentials and click on Log In button.
Step - 7
On the next screen, click on Install or Upgrade Product link.

Step - 8
Check the checkbox Plesk and select the Plesk version from drop down menu. Click on Continue button.

Step - 9
On the next screen, select the Installation Type as Custom and click on Continue button.

Step - 10
Select the componenets you wish to install in your server and click on Continue button. In the default VPS configuration, we install components selected in following screens. If you wish, you can select/deselect the components according to your requirements. In our setup, we chosen the MS SQL Server 2014, though you can select your choice of MS SQL Server.

Step - 11
Keep the paths of installation directory, user data and website content as they are. Specify the Plesk Administrator password and click on Continue button. This will launch the component installation process.

Step - 12
You can see the Plesk installation progress as shown in following screen. Note that Plesk installation may take approximate 1 to 2 hours based on your Internet connection.

When Plesk is installed, you will see following successful completion screen.

Step - 13
On the next screen, accept the terms of the license agreeement. Check the checkbox Do not show it again, if you don't want this screen appear again while login to Plesk. Â

Step - 14
On the View Selector screen, select your choice of View based on how you would use the Plesk Panel.


Step - 15
Specify the hostname of the server and change default administrator password. Click on OK button to proceed.

Step - 16
Specify the details of Plesk Administrator and click OK button to proceed.

Step - 17
On the next screen, click on Install Key to activate the Plesk license key.

Step -18
On the next screen, choose your choice of license activation method. Either specify the activation code you received in registered email account, OR you can upload the XML file of license key.
Step - 19
Specify the domain name of your first webspace, shared IP address, system user account username, password and click on OK button to proceed.

Step - 20
On the next screen, you will see Plesk Welcome screen as follows. You can simplly skip it by clicking on button OK, back to Plesk.

Step - 21
Browse the Plesk panel admin URL and you will see the Plesk dashboard screen as follows.
